MediaPipe Hand Tracking & Face Detection in JavaScript
22 Mar 2026(Updated 10 May 2026)

A beginner MediaPipe JavaScript example: build a rainbow drawing app in the browser. No npm, no backend, one HTML file.
What You'll Build#
A real-time hand tracking and face tracking web app powered by Google MediaPipe. Draw rainbow trails by pointing your index finger, burst star particles with a peace sign, and trigger a glowing MAGIC text effect by opening your mouth. All of it runs locally in the browser with zero installation.
Features at a glance:#
- ☝️ Rainbow Trail: draw smooth 7-band colour arcs in the air with your index finger
- ✌️ Star Burst: peace sign explodes gravity-affected star particles
- 😮 Mouth Trigger: open your mouth to summon the MAGIC text effect
- 🤲 Both Hands: each hand gets its own independent rainbow trail
Before You Start#
You need to serve the file over HTTP, not by opening it directly in your browser. getUserMedia() (webcam access) is blocked on file:// URLs.
Open a terminal in your project folder and run:
Step 1: HTML Shell and CSS Layout#
Create a file called index.html and paste this in. This is your complete starting point. The two canvas elements stack on top of the video using absolute positioning so effects draw over the webcam feed.
What you should see: A black page. Open the browser console (F12) and confirm you see Script loaded. Nothing visible yet since there is no video feed.
Step 2: Webcam Access#
Replace the console.log line with the code below. This requests the webcam, feeds it into the video element, and sizes both canvas layers to match the native camera resolution.
What you should see: Your webcam feed appears, mirrored like a selfie camera. The console logs something like Camera ready: 1280x720. If the browser asks for camera permission, click Allow.
Step 3: Load MediaPipe and Detect Hands#
Now we load the HandLandmarker model and start the detection loop. We add the import at the top and wrap everything in an init() function so we can use await to load the model before starting the camera.
The model returns 21 landmark points per hand. We log the index fingertip position to the console so you can confirm detection is working before drawing anything.
What you should see: The webcam feed as before. Open the console and hold your hand up. You should see a stream of Hand 0 tip: X, Y lines updating as you move your finger. Once confirmed, remove that console.log inside the loop since it runs at 30fps and will spam the console.
Step 4: Draw the Hand Skeleton#
Instead of logging coordinates, we draw the hand skeleton directly onto uiCanvas. This gives visual confirmation that tracking is accurate before we build gestures on top of it.
Remove the console.log from the loop and replace the loop function with this full version:
What you should see: A white wireframe skeleton drawn over your hand in real time, with a yellow dot on your index fingertip. Move your fingers slowly and confirm the skeleton follows accurately.
Step 5: Gesture Classification#
Now we classify what the hand is doing. The rule is simple: a finger is "up" if its tip has a smaller Y value than its middle knuckle (PIP joint). Y increases downward in image space, so a raised finger has a smaller Y at the tip.
Add this function above the loop function:
Then update loop to show the current gesture as a label:
What you should see: A yellow label in the top-left corner that updates as you change hand shape. One finger up shows draw. Two fingers shows burst. Open hand shows idle. Confirm all three work before moving on.
Step 6: Rainbow Trail#
When the gesture is draw, we record the fingertip into a trail array and render it as a smooth Catmull-Rom spline, with each of the 7 colour bands offset perpendicular to the path. This makes the rainbow arc naturally as your hand curves through the air.
Add these constants at the top of your script, right after the canvas setup lines:
Replace the loop function with this full version:
What you should see: Point your index finger at the camera and move it around. A 7-colour rainbow arc follows your fingertip and fades after about 2 seconds. Sweep your arm in a big curve and the rainbow should arc with you. Try both hands at once: each gets its own separate trail.
Step 7: Star Particles#
When the gesture is burst (peace sign), we explode star particles from the fingertip. Each star is a small physics object with velocity, gravity, and a fade timer.
Add these functions and variables to your script, before the loop function:
Inside the results.landmarks.forEach block in loop, add the burst branch right after the draw branch:
Then add the star physics update at the bottom of loop, just before requestAnimationFrame:
What you should see: Hold up two fingers (peace sign) and coloured star particles burst from your fingertip, arc upward slightly, fall with gravity, and fade out. Switch between one finger and two to alternate between drawing and bursting.
Step 8: Face Tracking and Mouth Detection#
We add FaceLandmarker alongside the hand model. Both run on the same video frame in every loop iteration. Mouth openness is measured as the gap between upper and lower lip divided by face height, so it works whether you are close or far from the camera.
Update the import line to include FaceLandmarker:
Add a variable alongside handLandmarker:
Add face landmarker creation inside init(), before the startCamera() call:
Add these constants near your other constants at the top:
Add face detection inside loop, right after the hand detection block and before the trail expiry code:
What you should see: Small white dots tracing your lip contours in real time. When you open your mouth the dots turn yellow and the console logs Mouth opened! once per open. Confirm this is working before adding the MAGIC text.
Step 9: The MAGIC Text Effect#
Add these constants near the top with your other constants:
Replace the console.log('Mouth opened!') line with this:
Add this function before the loop function:
Call it at the bottom of loop, just before requestAnimationFrame:
What you should see: Open your mouth wide and MAGIC pops up in large white Impact font below your chin, floats downward, and fades out after about 2 seconds. It triggers once per open. Close and reopen your mouth to trigger it again.
Step 10: Spongebob Face Overlay#

When the mouth opens we also show big cartoon goggle eyes with eyelashes and two oversized front teeth. Everything is drawn relative to face landmark positions so it scales and moves with your face automatically.
Add this function before the loop function:
Then call it inside the face detection block, right after the mouth dot drawing and before the closing } else {:
What you should see: Close your mouth and everything looks normal. Open it wide and two big cartoon goggle eyes with eyelashes pop onto your face, along with two oversized front teeth hanging from your upper lip. The left tooth is slightly bigger than the right for that classic Spongebob asymmetry. Close your mouth and it all disappears instantly.
A few things worth noting about how this works:
The eye position uses fx(fl[133]) and fx(fl[33]) for the inner and outer corners of each eye. The goggle centre is shifted upward by about half the eye width so it sits above the natural eye rather than directly over it, which gives more of a cartoon look. The radius is 2.4x the natural eye half-width.
The teeth are anchored to landmark 0 (the top lip centre) and sized relative to mouthW, the distance between the mouth corners (landmarks 61 and 291). This means they automatically scale with how close you are to the camera and stay correctly positioned as you move your head.
Complete File#
Performance Tips#
If the app runs slow, these adjustments help the most:
- Fewer particles. Lower
MAX_STARSfrom 80 to 40 on older machines. - One hand only. Change
numHands: 2tonumHands: 1if you do not need both hands. Detection time roughly halves. - Tune smoothing. If the rainbow feels laggy lower
SMOOTHtoward0.3. If it jitters raise it toward0.7. - No shadowBlur on particles. Canvas
shadowBlurforces a full GPU blur pass per draw call. At 80 particles that is 80 passes per frame. Never put it on individual particles. - Trail lifetime.
TRAIL_LIFETIMEis set to2200ms. Lower it toward1000for a snappier feel, raise it toward4000for a long lingering trail. - Grace period.
GRACE_FRAMES = 6gives a hand about 200ms to reappear before its trail is cleared. Raise it if the rainbow still disappears too easily, lower it if you want faster cleanup when you actually pull your hand away. - Minimum trail point distance. The
dist >= 2check avoids storing too many points when moving slowly. Raising it to 6 or8makes the spline lighter on slow machines.
Frequently Asked Questions
- How do I load MediaPipe HandLandmarker in JavaScript using a CDN?
Import
FilesetResolverandHandLandmarkerfrom the@mediapipe/tasks-visionpackage (version 0.10.3) via jsdelivr. CallFilesetResolver.forVisionTasks()with the WASM files path, then create the hand landmarker withHandLandmarker.createFromOptions(). Set themodelAssetPathtostorage.googleapis.com/mediapipe-models/hand_landmarker/hand_landmarker/float16/1/hand_landmarker.task,runningModeto"VIDEO",numHandsto2, anddelegateto"GPU"for best performance. This approach works in a single HTML file without any build tools, as demonstrated in the rainbow drawing app tutorial on this page.- What are the MediaPipe hand landmark indices for each fingertip?
MediaPipe's 21 hand landmarks use these indices for fingertips: thumb tip is
4, index finger tip is8, middle finger tip is12, ring finger tip is16, and pinky tip is20. The base of each finger starts 3 indices lower (for example, the index finger MCP joint is landmark5). These indices are the same across the JavaScript, Python, and native MediaPipe SDKs and are useful for detecting gestures like pinch, spread, or pointing.- How does MediaPipe handle handedness when using a mirrored selfie camera?
MediaPipe's hand landmarker assumes the camera input is mirrored, like a front-facing selfie camera. A detected "Left" hand actually corresponds to the user's left hand when using a webcam in selfie mode. To mirror the video, apply CSS
transform: scaleX(-1)on the video element, then flip the x coordinates in your drawing code by calculating(1 - point.x) * canvasWidth. This is the approach used in the rainbow drawing app on this page, where the canvas overlay stays aligned with the mirrored video feed.- What are the key MediaPipe face mesh landmark indices for eyes, mouth, and chin?
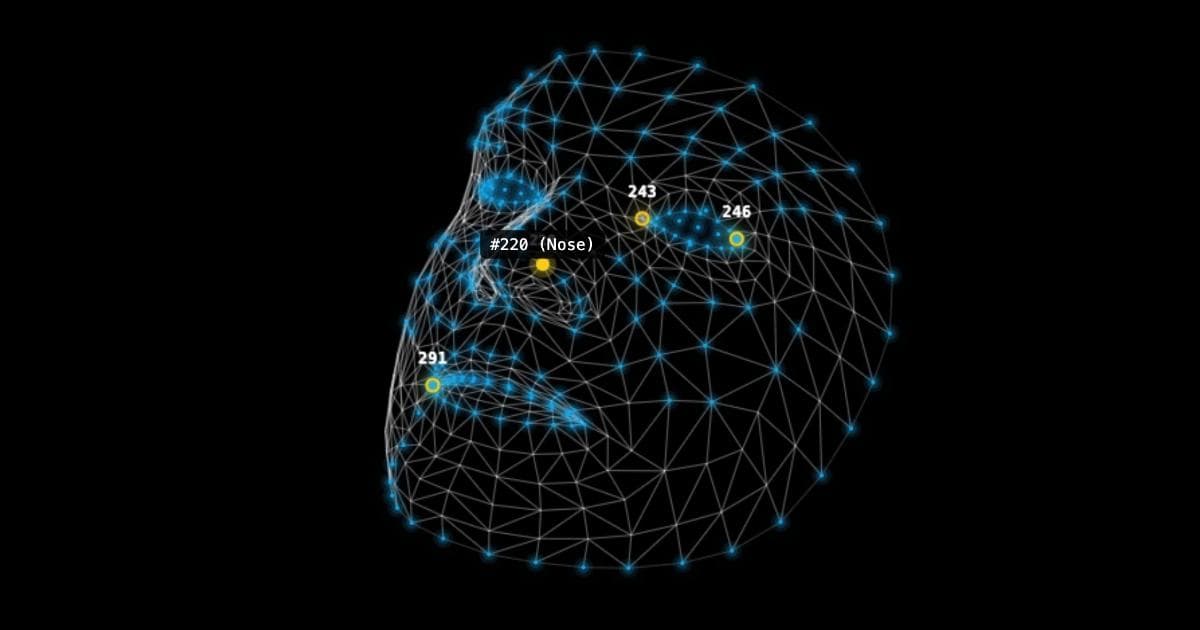
The most commonly used face mesh landmark indices are:
- Outer eye corners:
33(left) and263(right) - Inner eye corners:
133(left) and362(right) - Mouth corners:
61(left) and291(right) - Upper lip center:
13 - Lower lip center:
14 - Top lip center:
0 - Nose tip:
1 - Chin:
152
In the rainbow drawing app on this page, these landmarks are used to position a Spongebob face overlay and detect mouth openness by comparing the vertical distance between landmarks
13and14against a threshold relative to the face height.- Outer eye corners:
- How do I use HandLandmarker.detectForVideo() with a webcam in JavaScript?
Create a
HandLandmarkerinstance withrunningModeset to"VIDEO"anddelegateset to"GPU". In your animation loop usingrequestAnimationFrame, callhandLandmarker.detectForVideo(videoElement, performance.now())on each frame. The method returns an object withlandmarks(normalized 2D coordinates),worldLandmarks(3D coordinates in meters), andhandednessarrays for each detected hand. You can then define your ownCONNECTIONSarray to draw the hand skeleton on a canvas, or use the landmark coordinates for gesture detection. In the rainbow drawing app tutorial on this page, the index fingertip (landmark8) coordinates are used to draw a rainbow trail on the canvas.- Where can I download the MediaPipe hand_landmarker.task and face_landmarker.task model files?
The official model files are hosted on Google Cloud Storage. For hand tracking, use
https://storage.googleapis.com/mediapipe-models/hand_landmarker/hand_landmarker/float16/1/hand_landmarker.task. For face landmark detection, usehttps://storage.googleapis.com/mediapipe-models/face_landmarker/face_landmarker/float16/1/face_landmarker.task. These are the float16 versions, which balance accuracy and browser performance. Reference these URLs directly in themodelAssetPathoption when creating a landmarker instance. The models load asynchronously and are cached by the browser after the first fetch.- How do I draw hand connections using HAND_CONNECTIONS in MediaPipe JavaScript?
You can define your own
CONNECTIONSarray as pairs of landmark indices, for example[[0,1],[1,2],[2,3],[3,4]]for the thumb chain and similar arrays for each finger. After callingdetectForVideo(), loop through each detected hand's landmarks. For each pair inCONNECTIONS, look up the x and y coordinates from the corresponding landmark indices and draw a line between them on a canvas usingctx.beginPath(),ctx.moveTo(), andctx.lineTo(). Scale the normalized coordinates (0 to 1) by the canvas width and height, and remember to mirror the x coordinate if your video is flipped. This gives you the skeleton overlay showing how the 21 hand landmarks are connected, as shown in the rainbow drawing app tutorial on this page.- How do I detect finger gestures like peace sign or pointing with MediaPipe in JavaScript?
Check whether each fingertip landmark has a lower y value (higher on screen) than its corresponding PIP knuckle joint. For example, the index finger is "up" when landmark
8(tip) has a smaller y than landmark6(PIP joint). Write anisUp(tip, pip)helper function that comparestip.y < pip.y. Then classify gestures by counting which fingers are raised: index finger only means pointing (used for drawing in the rainbow app on this page), index plus middle finger means peace sign (triggers star burst particles), and all five fingers up means open hand. This approach works reliably for front-facing webcam input.
Resources
- Live demo
- Download Source Code
- MediaPipe Hand Landmarker Docs
- MediaPipe Face Landmarker Docs
- MediaPipe Tasks Vision on CDN
- MediaPipe
- Webcam
- WebGL
- Javascript
- HTML
- Canvas
- Computer vision
- Gesture recognition
- hand tracking
- face mesh
- Landmarks